
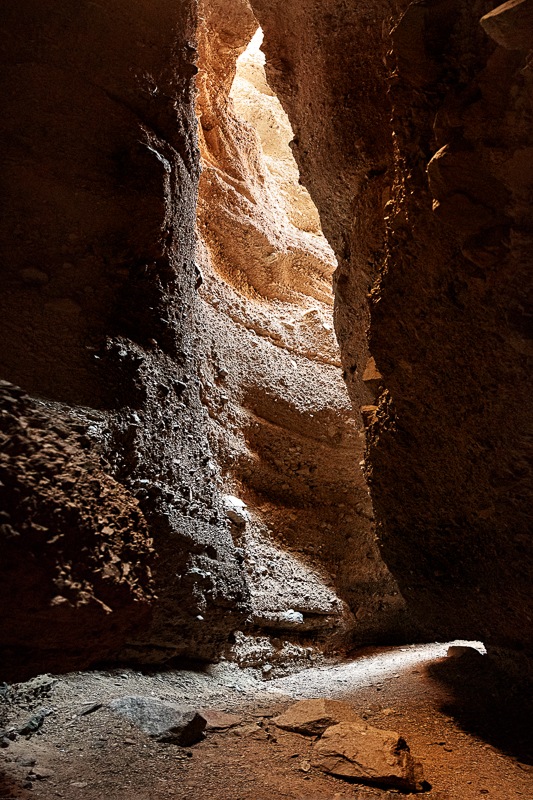
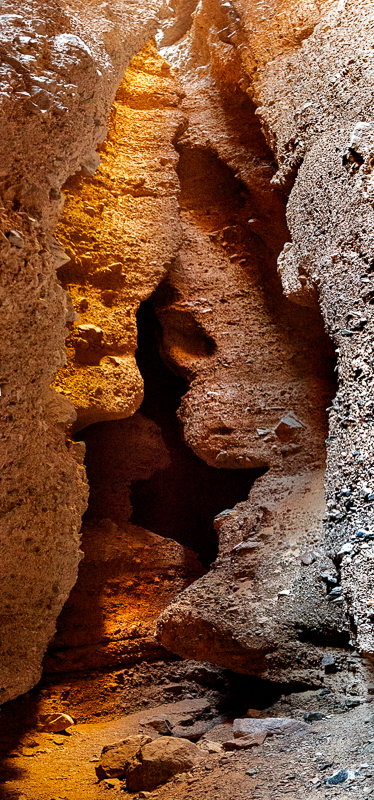
Slot Canyons In Baker CA
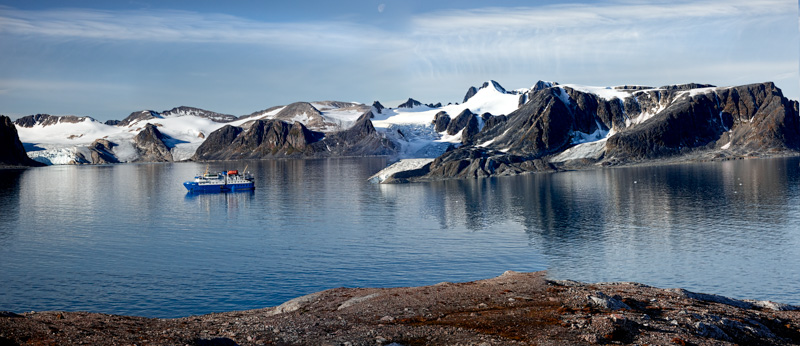
Journey To The North Pole
This was by any measure a very successful expedition. Many expeditions are lucky if they can get close enough to take pictures of even a single polar bear, and some never even catch sight of a polar bear. On our expedition we sighted nine polar bears and seven of them were close enough to get very good photographs. In addition to polar bears we had good opportunities to photograph walrus, birds, icescapes, and landscapes.
I found the Arctic with its rugged mountains, barren landscape, soft and ever present light of the sun, ice bergs, and the wondrous pancake ice in the ice pack to be an unique experience. You have two ways you can join me on a virtual journey to the North Pole. You can:
Watch a short slideshow of my journey, including a short movie clip of the collapse of a large section of the wall of a glacier; and/or you can view the pictures from this trip in my Svalbard album. Whichever choice you make, I trust you will enjoy sharing my trip to the top of the world.
Svalbard Slide Show
Svalbard Photo Album
The Making Of A Photograph
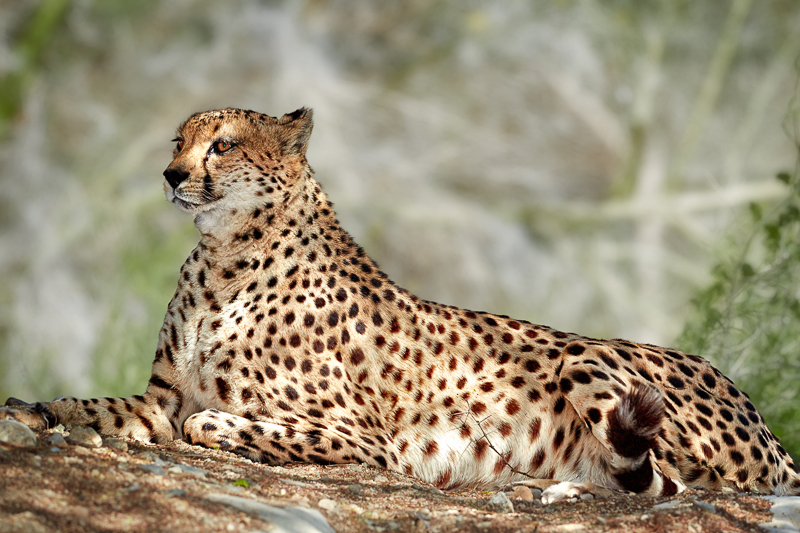
So, I was having fun but not seeing anything great. And then we came upon the cheetah enclosure. At first not much was happening. But after watching for a bit I noticed one of the cheetahs had moved to a mound of dirt in the center of the enclosure and was giving an interesting pose. So I set up the tripod and shot a picture. The cheetah was happy and stayed put, so I started working the shot, both the composition and the exposure. The result is the photograph at the top of this page.
Bill and Tim were watching me as I worked the shot, and we talked about the use of fill flash to improve the exposure and other aspects of the shot. So, I thought it might be useful to others to illustrate the steps I took to get this shot. Here goes….
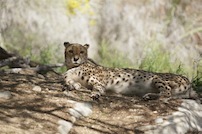
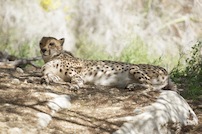
But, I still had a couple of problems with the shot: I was losing too much of the cheetah
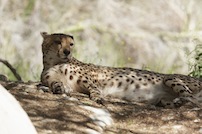
My next step was to move the tripod. I actually moved it about three times (a total of about 3 feet to the right) before I completely eliminated the rock and avoided some other distractions further left of the cheetah.

I then optimized the final version of the picture using my usual workflow in Photoshop. My workflow involves the usual global adjustments for exposure (white point, black point and brightness), contrast, and color balance. I also apply creative sharpening and local contrast adjustments using dodge and burn techniques. I also used a mask to selectively blur and darken the background so that it wouldn’t detract from the main subject, the cheetah.
Costa Rica
Shooting in the tropical climate is different. The sun comes up quickly and at a steep angle, so the soft morning light is almost non-existent. The trees and vegetation create harsh shadows and situations where the background is brightly lit, while the subject is in deep shade. We used fill flash to try and balance the exposure between the shadow and the bright background. Until this trip I had only used my flash occasionally. So, in addition to great subject matter, I had a crash course from Greg and Joe in flash photography.
For this trip I have assembled both a slideshow and a photo album. Warning, the photo album is large. Even after editing it down I ended up with 99 pictures and I couldn’t seem to reduce it further, so I put all 99 in the album. The following links will take you to either the slideshow or the album. Enjoy!
Costa Rica Slideshow
Costa Rica Photo Album

Salton Sea & Dunes
However, all was not lost. We still had plenty of good light to work with, along with some cooperative pelicans.

Next we went to explore the mud pots in the geothermal area next to Salton Sea. The joy of spending an hour taking pictures of bubbling mud is something only a photographer can understand.
The third stop on our agenda was Salvation Mountain.

Our final stop was a tour through the sand dunes west of Yuma. We didn’t have four wheel drive, so our access to the dunes was limited. We went there just after a three day weekend, so the dunes were all covered in tracks. Still it was fun. We also visited a monument to the Plank Highway. This highway was used between 1915-1926 for cars to cross 6.5 miles of sand dunes in the area of what is now Interstate 8.
This was another fun outing. Click Here to see pictures from this outing. Enjoy.

2012 Wall Calendar of Tanzania Pics
I wanted the pictures in the calendar to be a reasonable size so that they could be enjoyed, so I decided to compose the calendar using only 13 pictures - one for the cover and one for each of the 12 months of the year. The next problem to be addressed is which 13 pictures? So, I pondered the question for a bit and decided that I would use Barb for inspiration; this seemed to be a fitting way to remember her last trip. So, the pictures that I have selected are ones that I think she would have chosen among her favorites from the trip. And while not everything we saw is represented in the calendar, the 13 pictures do, I think, provide a nice summary of the Africa that we love.
The final detail that I had to address with the calendar was whether or not to annotate the pictures. I think the pictures that we’ve (we because Barb’s spirit is helping me out on this one) selected stand on their own and don’t need a title or description. However, I did feel that appropriate quotations would supplement the calendar. So, I made a decision to attach a quotation to each of the pictures. I choose to select religious quotations, mostly from the bible, that complemented the picture and were ones with which I think Barb would have agreed.
So, the art production work on the calendar is done and I’m in the process of working through the mechanical details required to get it printed. It will be ready for distribution in late January. Since our trip ended in February, and Barb went to her heavenly home in February, it seemed fitting to start the calendar with the month of February.
I will be giving some copies of the calendar away to family and friends. I will make copies available to others that request it. Most on-line services want $15-20 to print a calendar, but I think I can get it done for about $9 by printing it at Staples. So, if you want a calendar please let me know and I’ll send you a message when the calendars are ready. Who knows, you might get lucky and get one as a gift. You can request one by commenting on this blog entry and by sending me an email message (see link on Home page).

Scottish Highlands
In October I traveled to the Scottish Highlands for some landscape photography. Upon hearing about my trip to Scotland I usually get asked about the golfing in Scotland, however, as my golfing buds know, while I enjoy getting out for a round of golf I don’t enjoy it enough to plan a trip around golf or to pack my golf clubs along. The sole purpose of this trip was landscape photography and I limited the scope of my trip to solely the Scottish Highlands.
My original plans for this trip involved a PODAS Workshop (Phase One Digital Artist Series) in the southern region of the Highlands around Fort Williams, Scotland.

For me the most striking characteristics of the Highlands were the bog (hard to walk across and ubiquitous) and the striking orange-brown color of the foliage. The photograph of Loch Loyne at the top of this blog provides a good example of the fall color of the Highlands.

I enjoyed the trip and the weather wasn’t an issue. In face, I’m told that the weather during my visit was exceptional for this time of year. A couple of mornings we woke up to temperatures around freezing, and we only had a couple of days with some rain, but for the most part we enjoyed reasonable temperatures and partly cloudy skies. The landscape of rolling hills and the abundance of small lakes made for interesting photography. It was fun using the Phase One medium format camera; it’s resolution and picture quality is phenomenal. However, it is a very expensive system (the camera that I used in the workshop had a retail value of $40,000) and, for me, limited in utility to formal landscape photography and not the handheld style of photography in which I normally engage. So, while I’d love to have one to use, I don’t think Santa will be bringing one this year.
It was a fruitful trip. I learned a lot about landscape photography and came back with some good pictures and great memories. Click Here to see pictures from this trip. Enjoy.

The Palouse
The end of May I made a return trip to Moscow ID to visit my brother Gary and his wife Jeannie. I told my sister Elaine that I was going to

On my previous visit to Moscow last September I was inspired by the old abandoned trucks and buildings, along with the vast rolling fields of this part of Idaho and Washington. In fact, the area is so unique that folks here simply call it "The Palouse". So, the "sibling reunion" took the form of a photo tour of The Palouse - early rise for the good morning light; long afternoons searching for the perfect shot during the golden light of the afternoon, and exploration during the rest of the day. We did, however, find time for cherry pie and our last night together was a classic "goodies" and movies night.
Read More...Anza-Borrego Desert State Park

Joshua Tree National Park
Trip to Fort Collins and Estes Park, CO
Two Wild And Crazy Guys Visit Yellowstone
Read More...