
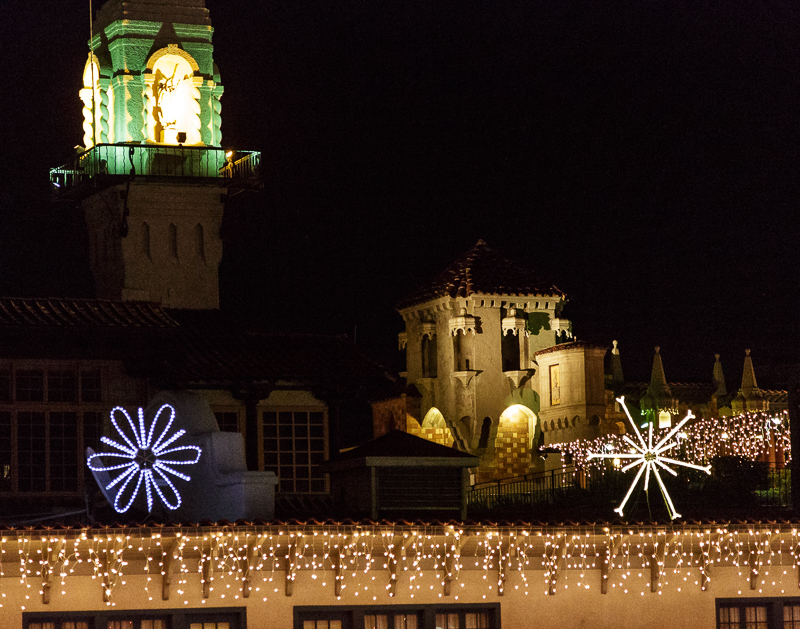
Mission Inn, Riverside
A Trilogy neighbor comes from a family that has historical ties to Riverside and the Mission Inn. Tonight my granddaughters and I were treated to a wonderful tour of the Mission Inn. We were able to visit a couple of guest rooms, the chapel, and generally were given access to the guest-only areas of the Mission Inn. I had no idea of the diversity of art and architecture at the Inn. We had a great time. Click here to enjoy pictures from our visit.
0 Comments
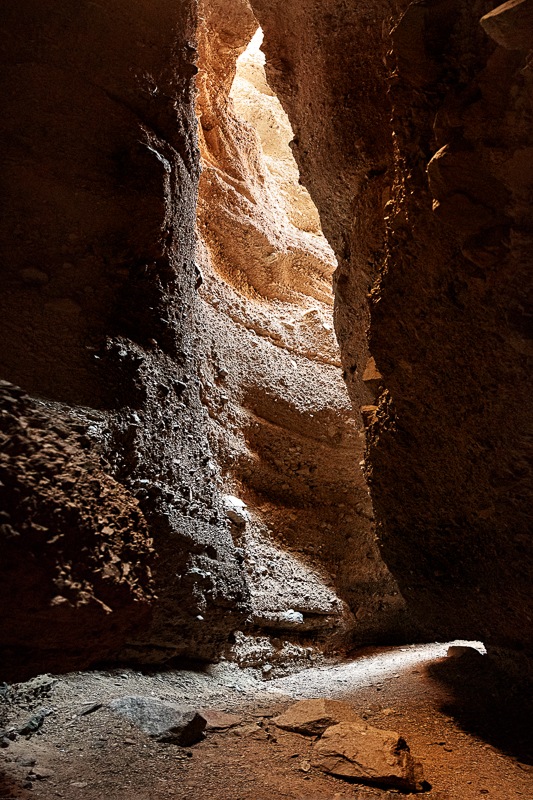
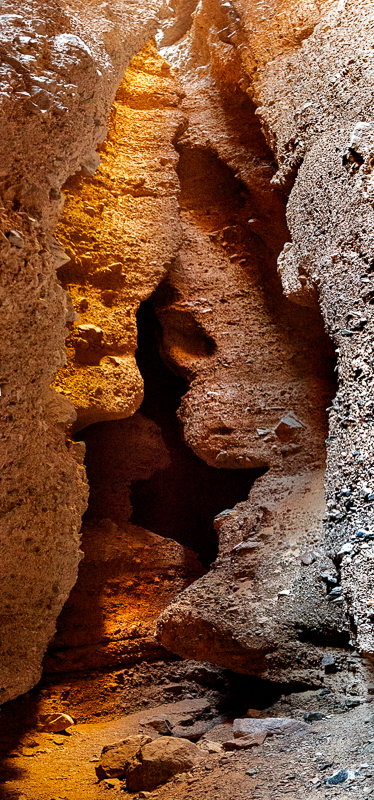
Slot Canyons In Baker CA
Tuesday Dec 17, 2013 Filed in: Photography
Everyone knows about the slot canyons near Page Arizona, but how many know of slot canyons in California? 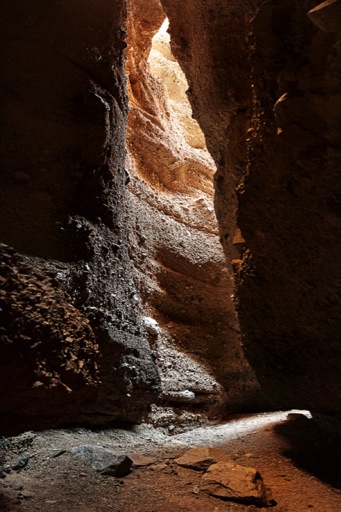 Last week I went riding on a quad in the desert near Baker, CA with a fellow photographer in Trilogy. He knew of the whereabouts of a slot canyon. While the red colored sandstone in Arizona's canyons is more colorful, the slot canyon we visited provided an interesting display of color and contrast. Unfortunately the angle of the sun this time of year is too low to get light shafts beaming down into the canyon. Enjoy.

Pauline & Louie Remarried
Friday Dec 13, 2013 Filed in: Friends
Happy Days are here again! Last week I had the pleasure of traveling to Las Vegas for Pauline and Louie’s wedding. The wedding ceremony and reception dinner took place in the Mount Charleston Resort. Other than the cold weather (the overnight low as around 12 and the bottle of water in my car was frozen solid the next day) it was a very warm event and we had lots of fun. You know I had to take pictures. So, for those of you that couldn’t come, and for those of you that were there, please help Pauline and Louie celebrate their reunion in marriage. Click here to see the pictures.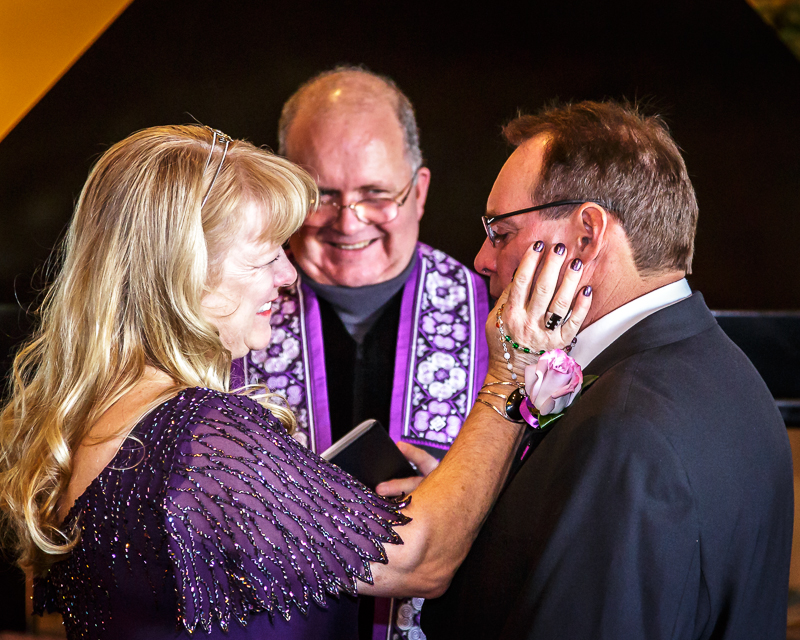
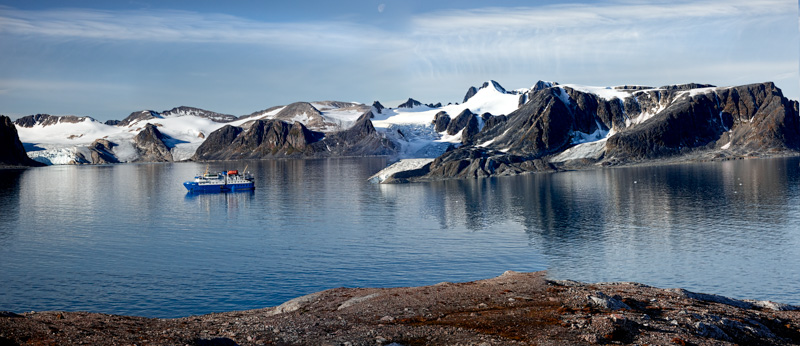
Journey To The North Pole
Monday Oct 21, 2013 Filed in: Photography | Travel
On August 24, 2013 I boarded the M/S Quest for a ten day photography expedition in the Svalbard Archipelago and north to the polar ice cap. During our ten days at sea we made frequent excursions on Zodiac boats, sometimes going ashore and sometimes taking pictures from the Zodiacs. We made two successful trips north to the ice pack, which covers the North Pole, searching for polar bears; our second trip took us as far north as the 82° 34’ latitude, or 450 miles from the North Pole.
This was by any measure a very successful expedition. Many expeditions are lucky if they can get close enough to take pictures of even a single polar bear, and some never even catch sight of a polar bear. On our expedition we sighted nine polar bears and seven of them were close enough to get very good photographs. In addition to polar bears we had good opportunities to photograph walrus, birds, icescapes, and landscapes.
I found the Arctic with its rugged mountains, barren landscape, soft and ever present light of the sun, ice bergs, and the wondrous pancake ice in the ice pack to be an unique experience. You have two ways you can join me on a virtual journey to the North Pole. You can:
Watch a short slideshow of my journey, including a short movie clip of the collapse of a large section of the wall of a glacier; and/or you can view the pictures from this trip in my Svalbard album. Whichever choice you make, I trust you will enjoy sharing my trip to the top of the world.
Svalbard Slide Show
Svalbard Photo Album
The Making Of A Photograph
Tuesday Apr 16, 2013 Filed in: Photography
Recently I visited the Living Desert Museum in Palm Desert. I went with a couple of other photographers from Trilogy; Bill and Tim. This was my first trip to the Living Desert; they have a nice collection of African and Colorado Desert wildlife in addition to a nice botanical garden. While I was having fun taking pictures, my expectations were low - it was a very windy day, so flower pictures were not going to happen, and the problem with any zoo is trying to compose an animal shot without getting undesirable elements of the enclosure in the picture.
So, I was having fun but not seeing anything great. And then we came upon the cheetah enclosure. At first not much was happening. But after watching for a bit I noticed one of the cheetahs had moved to a mound of dirt in the center of the enclosure and was giving an interesting pose. So I set up the tripod and shot a picture. The cheetah was happy and stayed put, so I started working the shot, both the composition and the exposure. The result is the photograph at the top of this page.
Bill and Tim were watching me as I worked the shot, and we talked about the use of fill flash to improve the exposure and other aspects of the shot. So, I thought it might be useful to others to illustrate the steps I took to get this shot. Here goes….
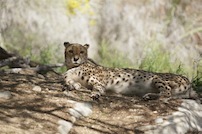 This is my first attempt at the photo (as you’ll see it often takes some work before I get the composition right. Like most of you, I make a lot of mistakes and it doesn’t come naturally). I had my 70-200 lens on the camera with a 1.4x teleconverter (280 mm focal length). My initial thought was to keep some of the environment in the shot. However, the cheetahs tail was too close to the right-hand edge of the picture, so I adjusted the framing and tried again.
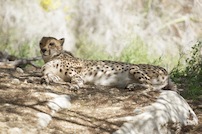 Better, but the rock in the picture was way too bright to my liking. So, I decided to go with my 300 mm lens and the 1.4x teleconverter (420 mm focal length). The resulting shot was a little tight, but I was able to eliminate most of the white rock.
But, I still had a couple of problems with the shot: I was losing too much of the cheetah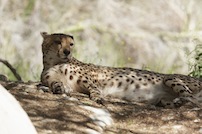 on the right hand side of the picture, and the piece of rock in the lower left-hand corner was too distracting. Also, it was about this point in time I knew that I had to do something about the harsh shadows in the picture.
My next step was to move the tripod. I actually moved it about three times (a total of about 3 feet to the right) before I completely eliminated the rock and avoided some other distractions further left of the cheetah. Fortunately I had brought my flash with me, so I got out the flash and the Better Beamer to efficiently project the flash to the cheetah. I knew from experience that I didn’t want full strength fill flash, so I dialed in a flash exposure compensation of -2/3. However, the resulting picture looked too “flashed”, so I dialed it down some more to a setting of -1 1/3; I liked the result much better.
I then optimized the final version of the picture using my usual workflow in Photoshop. My workflow involves the usual global adjustments for exposure (white point, black point and brightness), contrast, and color balance. I also apply creative sharpening and local contrast adjustments using dodge and burn techniques. I also used a mask to selectively blur and darken the background so that it wouldn’t detract from the main subject, the cheetah.
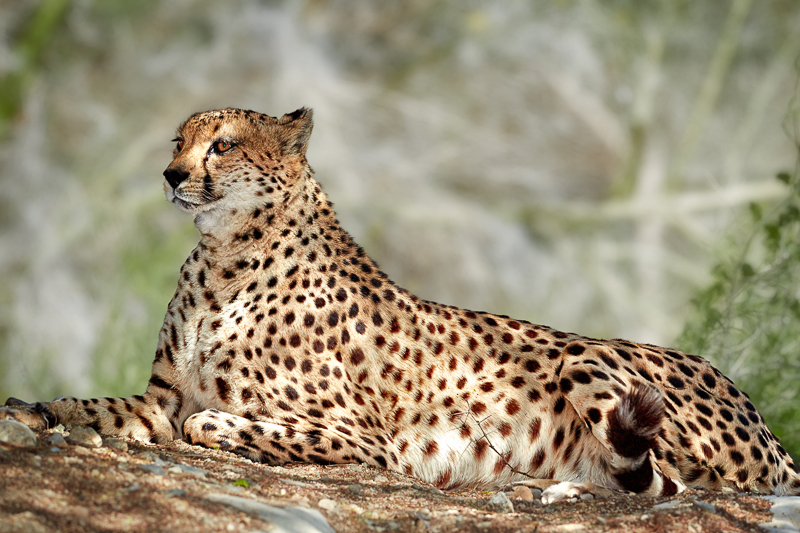
So, I was having fun but not seeing anything great. And then we came upon the cheetah enclosure. At first not much was happening. But after watching for a bit I noticed one of the cheetahs had moved to a mound of dirt in the center of the enclosure and was giving an interesting pose. So I set up the tripod and shot a picture. The cheetah was happy and stayed put, so I started working the shot, both the composition and the exposure. The result is the photograph at the top of this page.
Bill and Tim were watching me as I worked the shot, and we talked about the use of fill flash to improve the exposure and other aspects of the shot. So, I thought it might be useful to others to illustrate the steps I took to get this shot. Here goes….
But, I still had a couple of problems with the shot: I was losing too much of the cheetah
My next step was to move the tripod. I actually moved it about three times (a total of about 3 feet to the right) before I completely eliminated the rock and avoided some other distractions further left of the cheetah.
I then optimized the final version of the picture using my usual workflow in Photoshop. My workflow involves the usual global adjustments for exposure (white point, black point and brightness), contrast, and color balance. I also apply creative sharpening and local contrast adjustments using dodge and burn techniques. I also used a mask to selectively blur and darken the background so that it wouldn’t detract from the main subject, the cheetah.